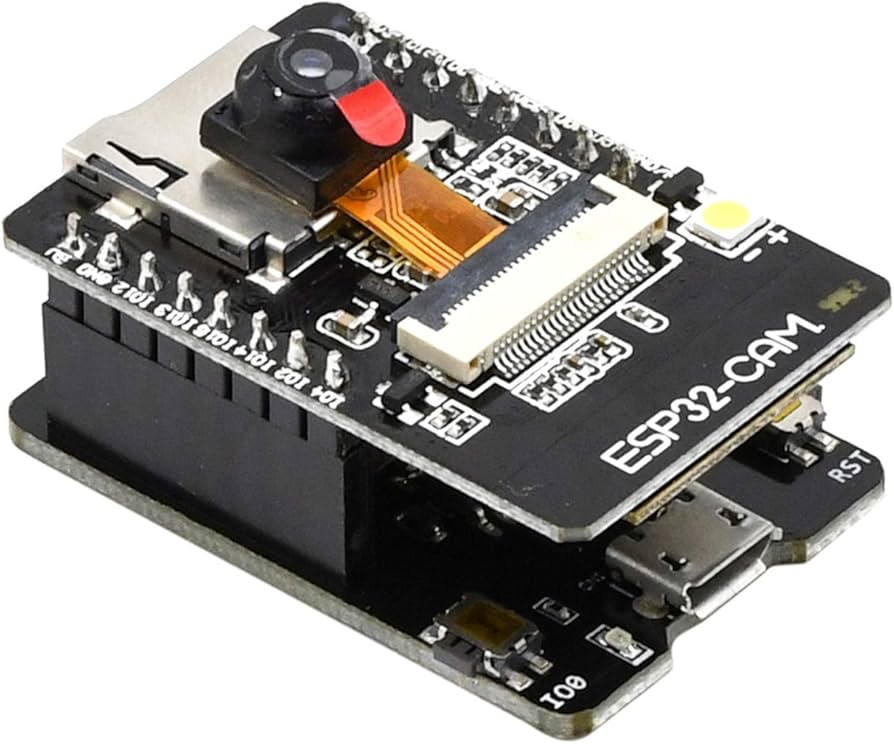
ESP32-CAM + ESP32-CAM-MB – 2MP OV2640, USB Programmer, microSD
٦٠٠ ج.م.
عرض موردين آخرين →الوصف
ESP32-CAM + ESP32-CAM-MB — 2MP Camera, PSRAM, microSD, USB Programmer Introduction Build camera projects in minutes with the ESP32-CAM paired with the ESP32-CAM-MB USB programmer. The camera board integrates an ESP32-S SoC with OV2640 2 MP sensor, 4 MB PSRAM, microSD slot, and onboard Wi-Fi/BLE—great for IP streaming, snapshots, face-detection demos, and IoT imaging. The ESP32-CAM-MB provides plug-and-flash over USB with auto-download signals, no jumpers or FTDI wiring required. Highlights ✅ One-cable programming: auto-reset/boot for hassle-free uploads. 📸 2 MP OV2640 sensor: crisp stills and common streaming formats. ⚙️ 4 MB PSRAM: smoother streaming and higher frame buffers. 💾 On-board microSD: local image/log storage. 🌐 Wi-Fi + BLE on ESP32: web servers, control apps, and OTA paths. What’s Included ESP32-CAM board (with OV2640 2 MP camera pre-fitted) ESP32-CAM-MB USB programmer/base board (Micro-USB or USB-C variant depending on batch) USB cable and microSD card are not included. Key Features 2 MP OV2640 camera: stills and MJPEG streaming; popular for AI/vision demos. 4 MB PSRAM: buffers frames for smoother streaming and higher resolutions. microSD slot: store JPEGs or logs locally (FAT/FAT32). Wi-Fi + BLE on ESP32: 2.4 GHz connectivity for web servers and OTA updates. ESP32-CAM-MB USB programmer: auto-reset/boot for one-click flashing—no external UART wiring. Rich community support: pinout maps, streaming examples, and step-by-step guides. Specifications Parameter ESP32-CAM ESP32-CAM-MB SoC / MCU ESP32-S dual-core Wi-Fi + BLE USB-to-UART base board for ESP32-CAM; auto-download lines Camera OV2640 2 MP (up to 1600×1200 / UXGA) — Memory 4 MB PSRAM — Storage microSD (TF) slot — Wireless 802.11 b/g/n 2.4 GHz + BLE — Interface / I/O GPIOs for flash, UART, I²C/SPI (limited due to camera use) Micro-USB/USB-C to PC; exposes UART & EN/IO0 for auto flash Power 5 V via 5V pin or MB; 3V3 pin for regulated input Bus-powered from USB; powers ESP32-CAM via header Typical current Peaks can exceed 300–500 mA when Wi-Fi + camera active (size your supply accordingly) — (Provide adequate USB source) Compatibility & Tips ⚡ Power first: for stable streaming, use a solid 5 V supply (≥1 A) to the MB or 5V pin. Avoid weak USB ports. 🔌 Flashing made easy: connect the ESP32-CAM-MB over USB and follow the quick upload guide—no manual IO0/EN toggling. 💾 microSD formatting: use FAT/FAT32; large, low-quality cards may cause timeouts. 📡 Antenna clearance: don’t press metal cases close to the PCB antenna; keep a small air gap for better Wi-Fi. Use Cases 📷 DIY IP camera & door-viewer 🧠 Tiny vision demos (object/face detection) 🔔 Test fixtures: capture photos to microSD on trigger 🌿 Garden/reef timelapse with periodic uploads Safety & Handling Handle the camera ribbon gently; seat fully before power-up. Avoid touching lens surface; use a dust cap when storing. Observe ESD precautions when handling ESP32 pins and the MB. Quality, Shipping & Batch Notes Each set checked for USB enumeration and camera preview. Minor differences exist across MB revisions (Micro-USB vs USB-C) with no functional impact. Packed with protective cushioning. Media & Downloads ESP32-CAM Module Datasheet (PDF) — hardware reference sheet (mirror). ESP32 Series Datasheet (PDF) — Espressif official SoC datasheet. OV2640 Image Sensor Datasheet (PDF) — OmniVision OV2640 specs. ESP32-Camera Driver & Example — Espressif component & sample project. Upload via ESP32-CAM-MB (Guide) — Programming with the USB base. FAQ Q1: Do I still need an FTDI adapter? A: No—the ESP32-CAM-MB provides USB-to-UART and auto-reset/boot for flashing. Q2: What power source should I use? A: A stable 5 V USB supply (≥1 A) via the MB is recommended; camera + Wi-Fi peaks can be high. Q3: Can I power at 3.3 V? A: Yes, via the 3V3 pin with a regulated 3.3 V source (bypasses the onboard LDO). Ensure clean, adequate current. حزمة ESP32-CAM + ESP32-CAM-MB — كاميرا 2MP وPSRAM وmicroSD ومبرمج USB المقدمة ابدأ مشاريع التصوير بسرعة مع لوحة ESP32-CAM مع مبرمج ESP32-CAM-MB عبر USB. تدمج اللوحة معالج ESP32-S مع حساس OV2640 بدقة 2 ميجابكسل وPSRAM وفتحة microSD واتصال Wi-Fi/BLE—مناسبة للبث والتقاط الصور والتعرّف على الوجوه. يوفّر ESP32-CAM-MB توصيلًا مباشرًا بالحاسوب مع تبديل تلقائي لوضع التحميل لبرمجة سهلة دون أسلاك FTDI. ما المرفق لوحة ESP32-CAM (مع كاميرا OV2640 2MP مركّبة) لوحة ESP32-CAM-MB (مبرمج USB؛ قد تكون نسخة Micro-USB أو USB-C حسب الدُفعة) الميزات الرئيسية 📸 كاميرا OV2640 بدقة 2MP للبث والتقاط الصور. ⚙️ ذاكرة PSRAM سعة 4MB لتحسين تخزين الإطارات وجودة البث. 💾 فتحة microSD لحفظ الصور والسجلات محليًا. 🌐 واي فاي وبلوتوث على شريحة ESP32. 🔌 مبرمج USB ESP32-CAM-MB مع إعادة/إقلاع تلقائي للتحميل السريع. 💡 مجتمع وأمثلة جاهزة: خرائط أرجل وأمثلة بث خطوة بخطوة. المواصفات البند ESP32-CAM ESP32-CAM-MB المعالج ESP32-S ثنائي النواة Wi-Fi/BLE لوحة تحويل USB-to-UART مع إشارات التحميل التلقائي الكاميرا OV2640 2MP (حتى 1600×1200) — الذاكرة 4MB PSRAM — التخزين microSD (TF) — الاتصال Wi-Fi 2.4GHz + BLE — الواجهات GPIOs محدودة (بسبب استخدام الكاميرا) Micro-USB/USB-C إلى الحاسوب؛ تمكين EN/IO0 تلقائيًا التغذية 5 فولت عبر منفذ 5V أو عبر MB؛ 3.3 فولت ممكن عبر 3V3 منظم يُغذّى من USB ويغذّي لوحة ESP32-CAM التيار النموذجي الذروات قد تتجاوز 300–500 mA مع الكاميرا + Wi-Fi — التوافق والنصائح ⚡ التغذية أولًا: استخدم مزوّد 5 فولت مستقر (≥1 أمبير) عبر MB أو رجل 5V لتجنّب إعادة التشغيل. 🔌 البرمجة السهلة: وصّل ESP32-CAM-MB بالـUSB واتبع دليل الرفع—لا حاجة لتبديل IO0/EN يدويًا. 💾 تهيئة microSD: استخدم FAT/FAT32؛ البطاقات الرديئة قد تسبب أخطاء زمنية. 📡 المسافة عن المعدن: اترك فراغًا صغيرًا حول هوائي الـPCB لتحسين الإشارة. الأسئلة الشائعة س1: هل أحتاج محوّل FTDI منفصل؟ ج: لا—ESP32-CAM-MB يوفّر منفذ USB-to-UART مع إعادة/إقلاع تلقائي للتحميل. س2: ما أفضل طريقة للتغذية؟ ج: عبر USB لمبرمج MB أو 5V موثوق؛ الذروات العالية أثناء البث تحتاج مصدرًا قويًا. س3: هل يمكن تغذيته بـ3.3 فولت؟ ج: نعم عبر رجل 3V3 بمنظّم نظيف (يتجاوز منظّم اللوحة). راقب التيار.
من صفحة المورد.
مخزن لا يبيع — كل عرض يفتح موقع المورد نفسه.